If you’re creating video projects using editing tools from Adobe Creative Cloud, you’re most likely using Adobe Premiere Pro or Adobe Premiere Rush as your editing software. Adobe Premiere is one of the top video editing tools used by content creators today.
In this guide, we’ll walk you through step-by-step exactly how add music to Adobe Premiere, including adding audio clips to your sequence and adjusting the volume of your added song files.
We’ve included both quick text guides and detailed visual step-by-step guides (complete with pictures) to make it super easy. Use our table of contents below to jump right to your preferred tutorial. You’ll be on your way to editing amazing videos with music in no time!
More Resources
- Adobe Premiere Pro vs Adobe Premiere Rush
- Video tutorial of adding music to your video using Adobe Premiere
- How to get copyright-free music for videos
How to Add Music to Adobe Premiere Pro
Adobe Premiere Pro is a desktop-only video editing tool. Once it’s installed on your computer, follow our quick steps or detailed guide below to easily add music to your project.
Quick Steps to Add Music in Adobe Premiere Pro:
- Open Adobe Premiere Pro on your desktop computer.
- Start a New Project or open an existing project.
- Import music files stored on your computer using one of the following methods:
- Click File > Import (or use the Import button at the top of the screen) to browse your device and select your audio file.
- Drag and drop the song file directly into the Project panel.
- Use the Media Browser panel to locate your song file, then right-click and select Import.
- To use Adobe Stock music, open the Essential Sounds panel, go to the the Browse tab and search for music. You can preview, license, and add songs directly to your project.
- Once your music is in the Project panel, drag it into the timeline to add it to your video sequence and begin editing your video to the music
Detailed Instructions to Add Music in Adobe Premiere Pro:
First, open Adobe Premiere Pro on your computer and either click New Project to start a new project, or click Open Project to open your existing video project.
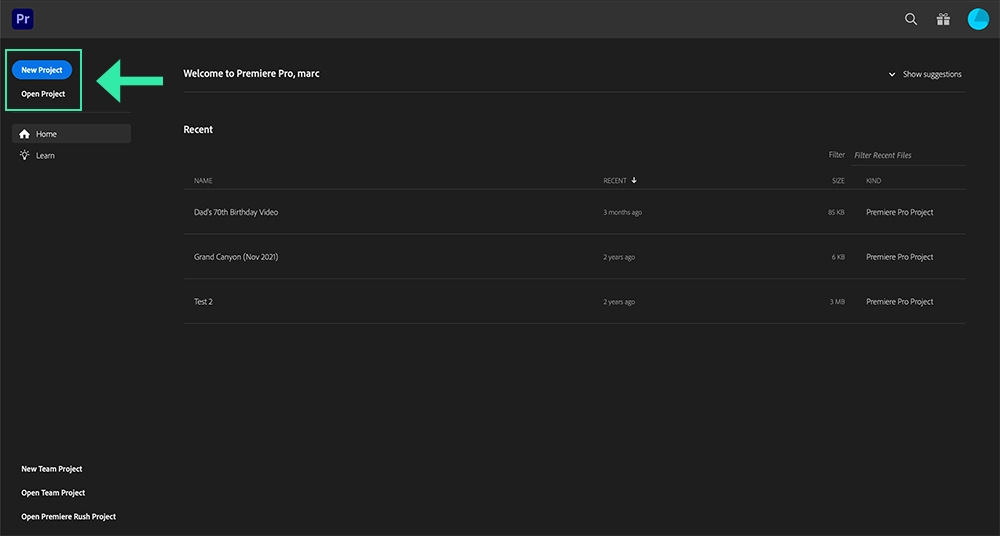
Within your editing view, you have a few options when it comes to adding music to your sequence. Let’s walk through all of the ways you can easily add songs and audio files to your Premiere Pro video project.
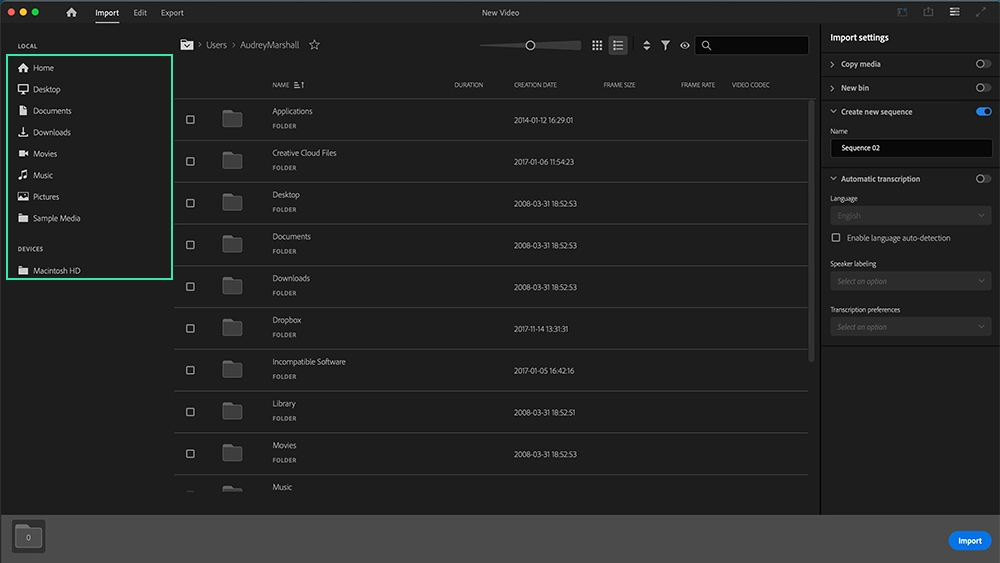
Click Import from the top of the screen to browse your computer and hard drive for your audio files. You can quickly jump to different folders on your computer using the side navigation menu.
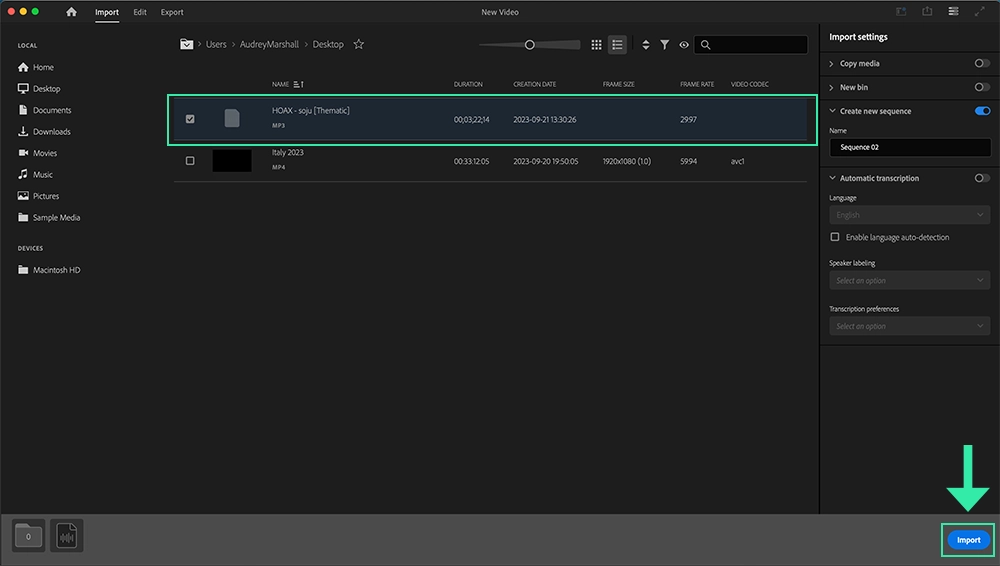
With your songs selected, simply click the Import button at the bottom.
👉 Pro Tip: Are you looking for copyright-free music for videos? Click here to find out how to use music from trending artists in your videos for free!
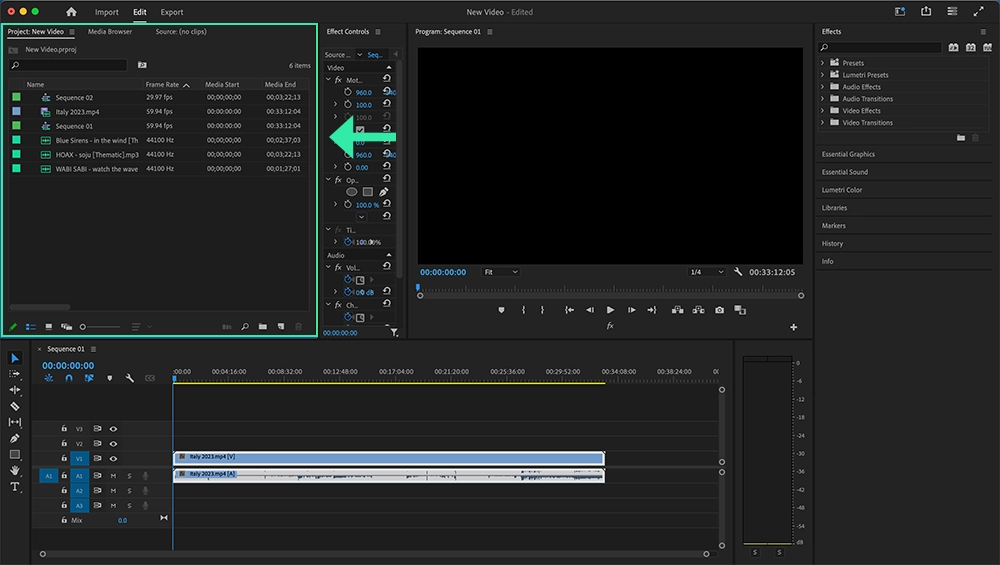
This will add your song file to your project files panel.
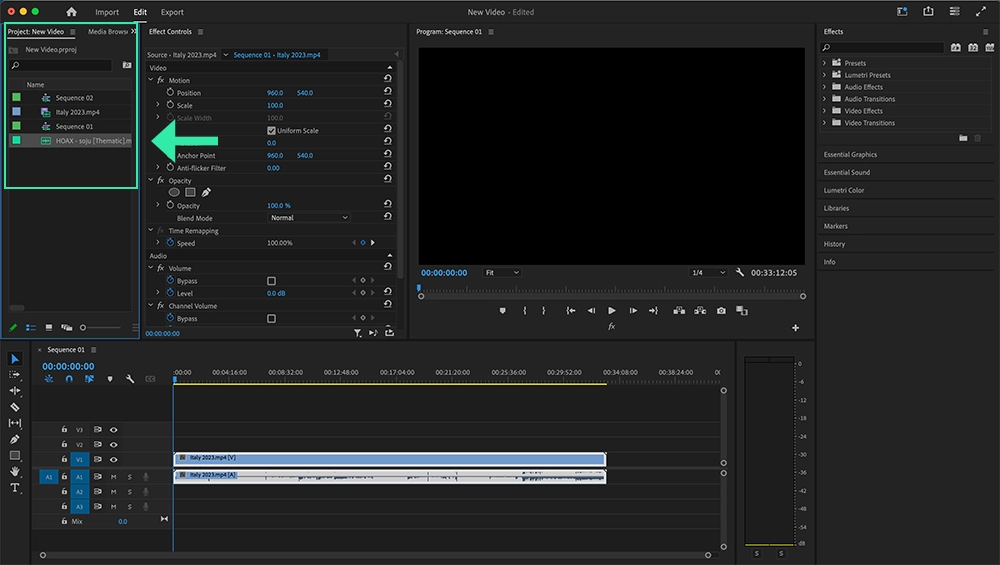
Another way to easily add music to your Premiere video project is to simply drag the song file from your computer into the project files panel within Adobe Premiere.
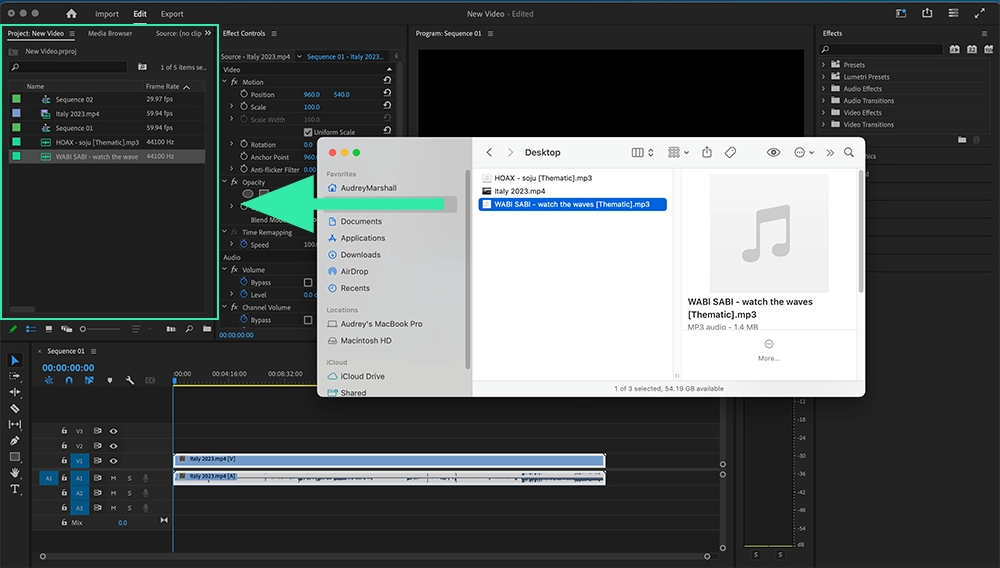
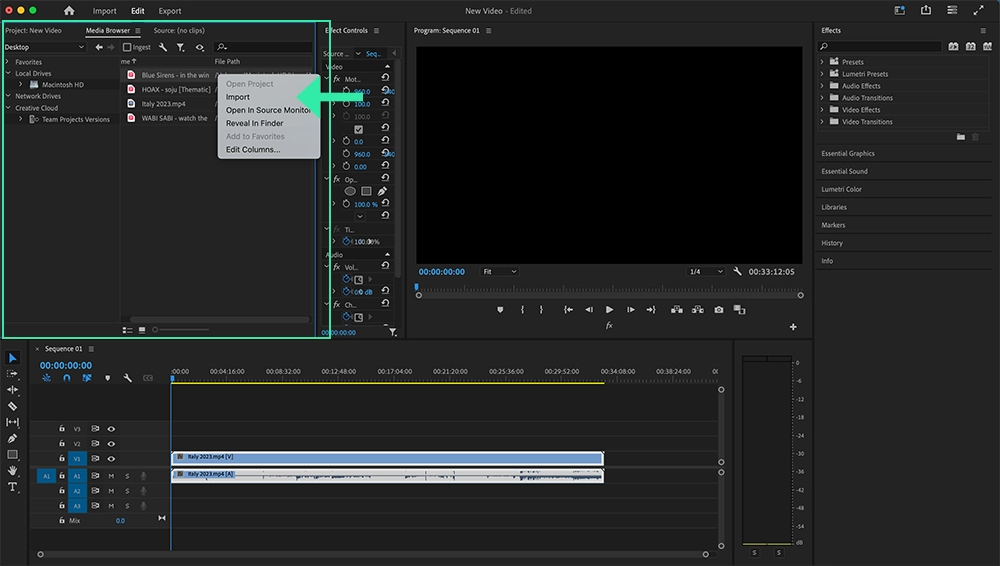
One more way to add songs to your project is to select the Media Browser panel and browse your computer or hard drive for your song files. Once you have located the songs you would like to use, simply right click the file and select Import from the drop-down menu.
All of your added song files will now show within your project files panel.
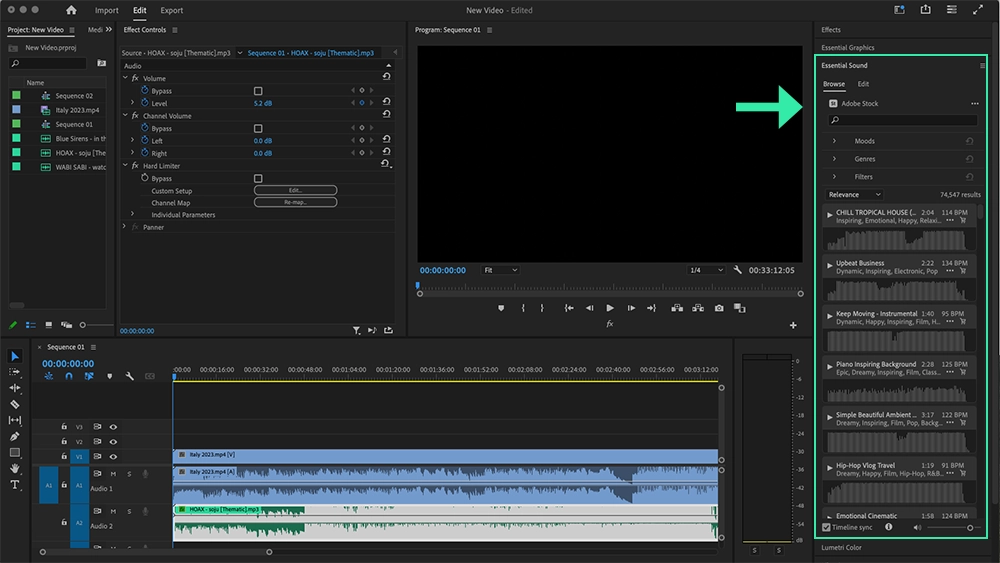
If you prefer to add music to your video edit from Adobe’s Stock Music library, you can browse their sound library by clicking the Browse tab of the Essential Sound panel.
👉 Note: The songs from Adobe’s Stock Music library are not free to use or copyright-free (they are available to be purchased). These songs can only be used according to the licensing terms provided by Adobe or you may be at risk of copyright infringement or copyright claims.
How to add a song or audio file to your video sequence
To add a song to your video sequence, follow these steps:
- Select the audio file you want to use from the Project panel.
- Drag the audio file directly into your sequence timeline.
- Place the audio on one of the audio tracks (A1, A2, A3, etc.) in the timeline. You’ll recognize these tracks by the labels on the left side of the timeline.

Your song has successfully been added to your video edit! Now you can edit the song to your video!
How to adjust the volume of an audio track in Premiere Pro
To adjust the volume of your audio track in Premiere Pro, you have three simple options:
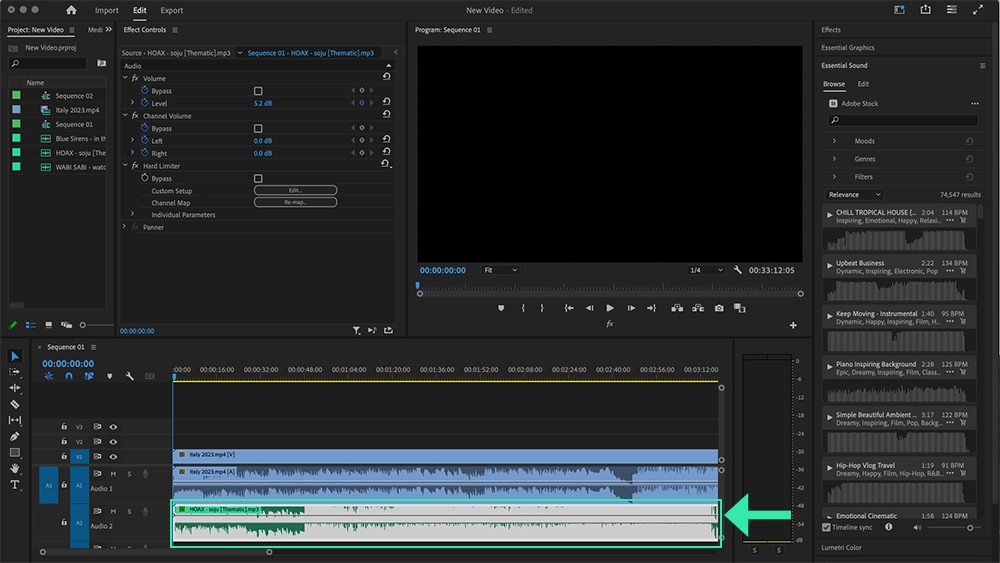
Option 1: Adjust Volume Using the Timeline:
- Select the audio file in your sequence.
- Hover over the volume line (running through the waveform) and drag it up or down to increase or decrease the volume.
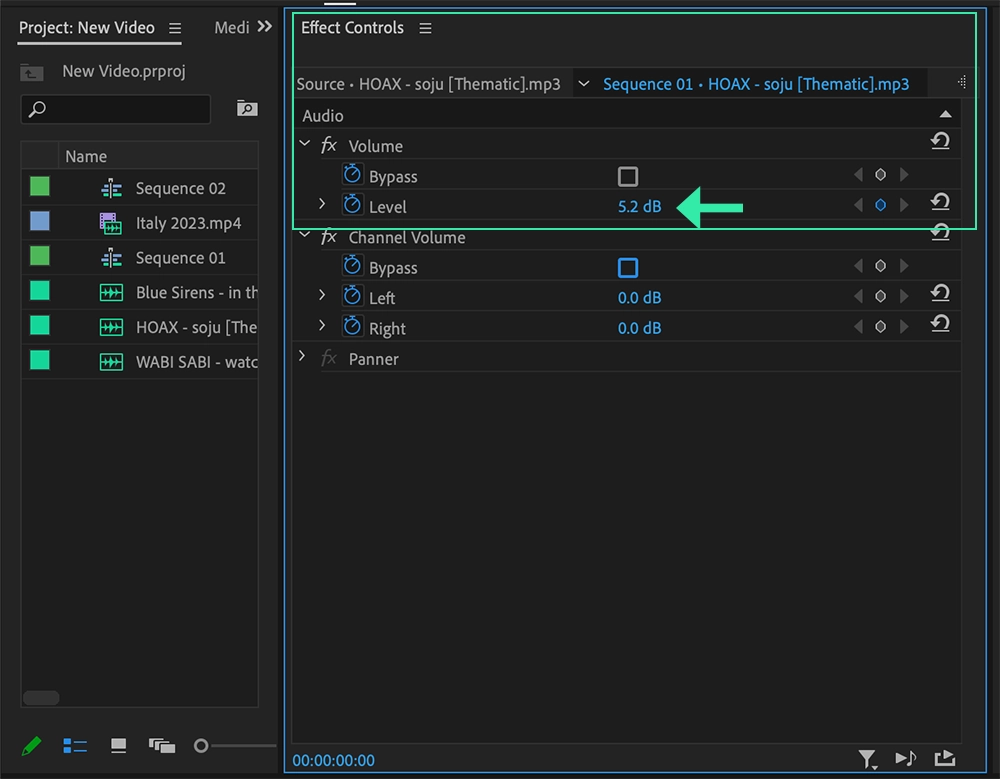
Option 2: Manual Volume Control via Effect Controls:
- Select the audio clip in your sequence.
- Go to the Effect Controls panel and locate the Volume section.
- Adjust the Level by entering a positive number to increase the volume, or a negative number to decrease it.
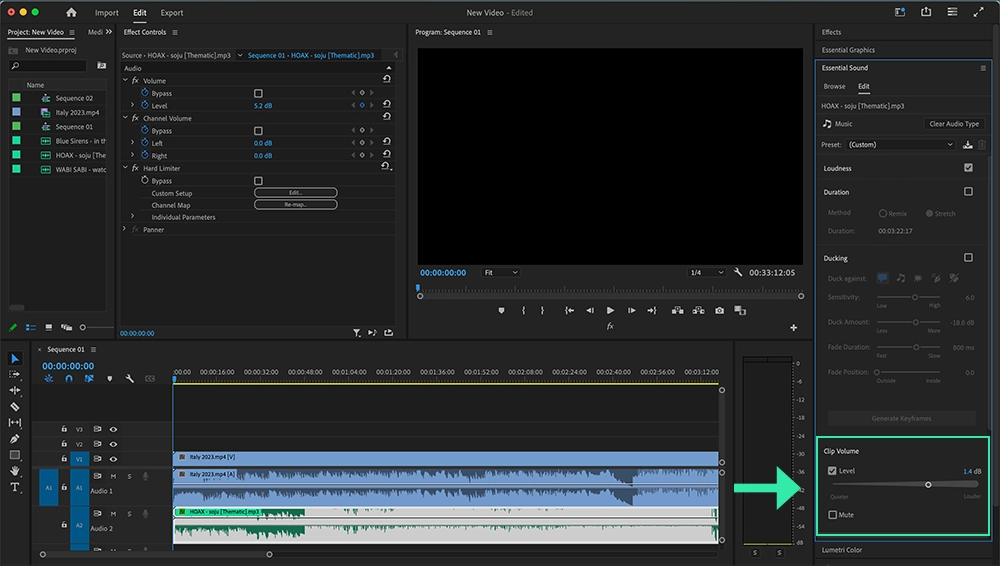
Option 3: Adjust Volume Using the Essential Sound Panel:
- Select your audio clip in the timeline.
- Open the Essential Sound panel and click on the Music option.
- Use the Clip Volume slider to adjust the audio level.
How to Add Music to Adobe Premiere Rush Mobile App
Adobe Premiere Rush is designed for video creators who want to quickly edit high-quality videos directly from their mobile devices. After downloading the app to your phone, you’ll be just a few simple steps away from enhancing your videos with music – anytime, anywhere.
Follow our quick and detailed guides to easily add music to your videos using the Adobe Premiere Rush mobile app.
Quick Steps to Add Music in Adobe Premiere Rush Mobile App:
- Download the Adobe Premiere Rush mobile app to your device and login to your account.
- Create a project: Tap Videos and select the video files you want to include in your project. After selecting your files, name your project and click Create to generate your video sequence.
- Add Music from your device:
- Tap the blue + button in the bottom menu bar and select Your Media.
- Go to the Audio tab to choose music from your iTunes or Apple Music library.
- Or, tap the Files tab to select music from your phone’s Files folder. Click Import from Files, locate your audio files, and click Add to include them in your video sequence.
- Use Adobe’s Music Library:
- If you’d like to use royalty-free music from Adobe, tap the blue + button in the edit screen, then select Audio.
- Browse through their collection of songs and sound effects to find the perfect track for your video.
- Now you’re ready to edit your video with the music of your choice!
Detailed Instructions to Add Music in Premiere Rush Mobile App:
Download the Adobe Premiere Rush mobile app to your phone or mobile device and login using your Adobe account. Keep in mind that access to features in the app will depend on your subscription with Adobe.
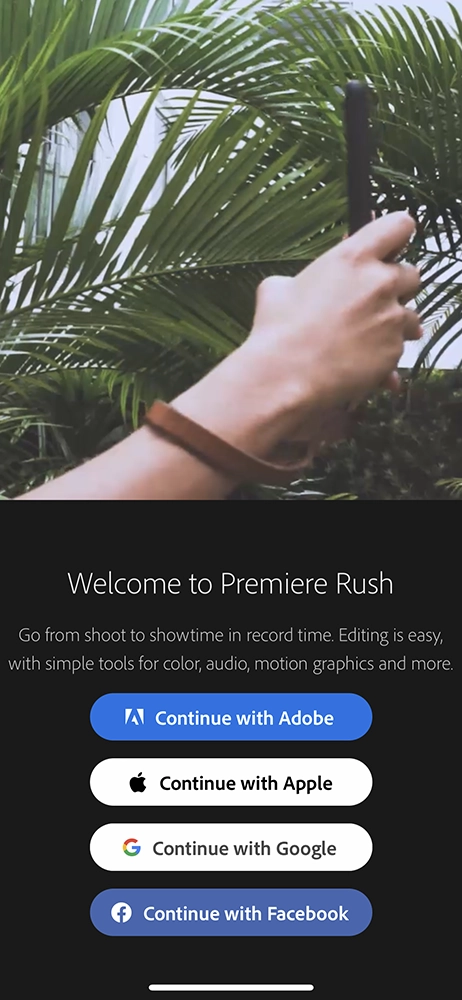
On the home screen, you can start a new video project by clicking Videos from the menu options.
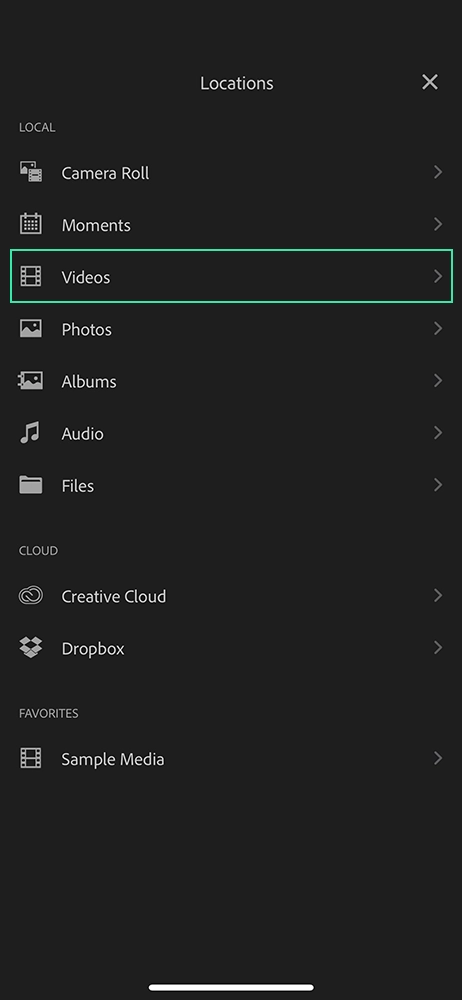
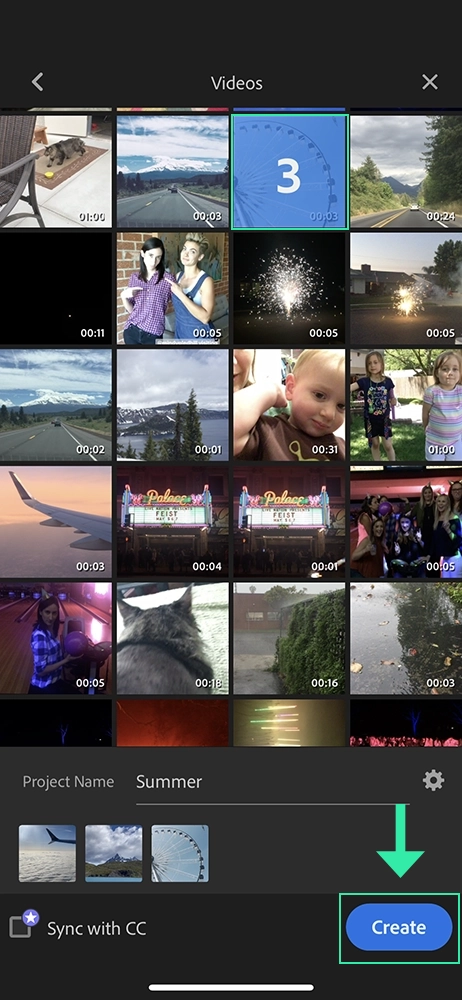
On the Videos page, browse and select videos downloaded on your phone that you would like to include in your video sequence. Once all of your video files are selected, give your project a name and click Create to create your video sequence.
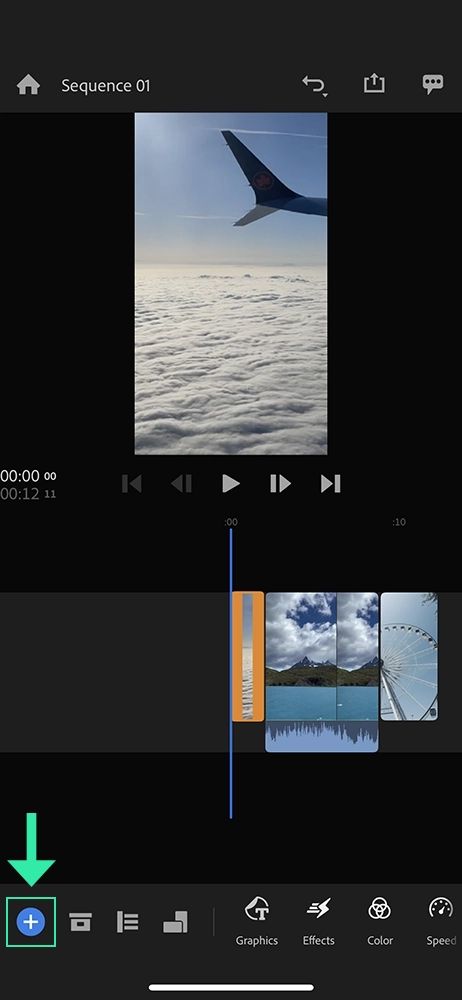
If you would like to add music to Rush that is downloaded to your phone, click the blue + button from the bottom menu bar.
Then select the Your Media button.
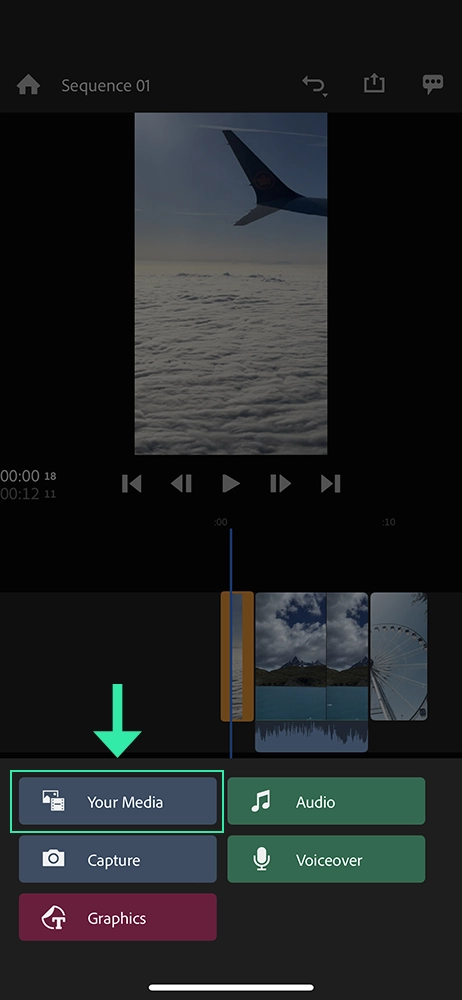
You have a few options to add music to your video. If you would like to add music from your phone’s iTunes or Apple Music library, select the Audio menu item.
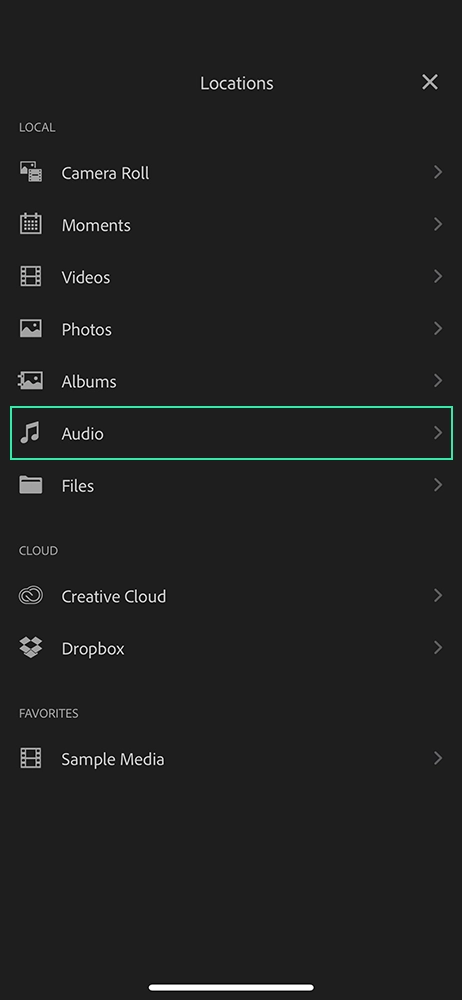
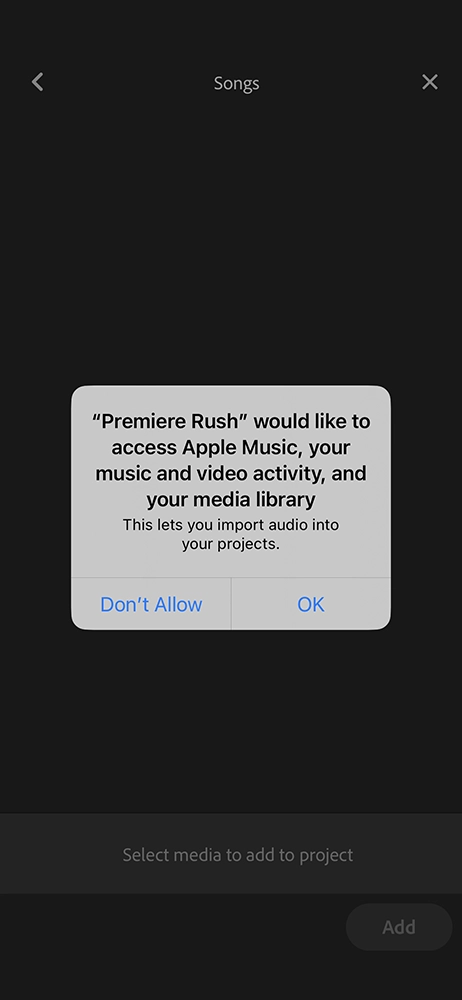
After allowing access to your Apple media library, you can browse and select from the song files downloaded to your device.
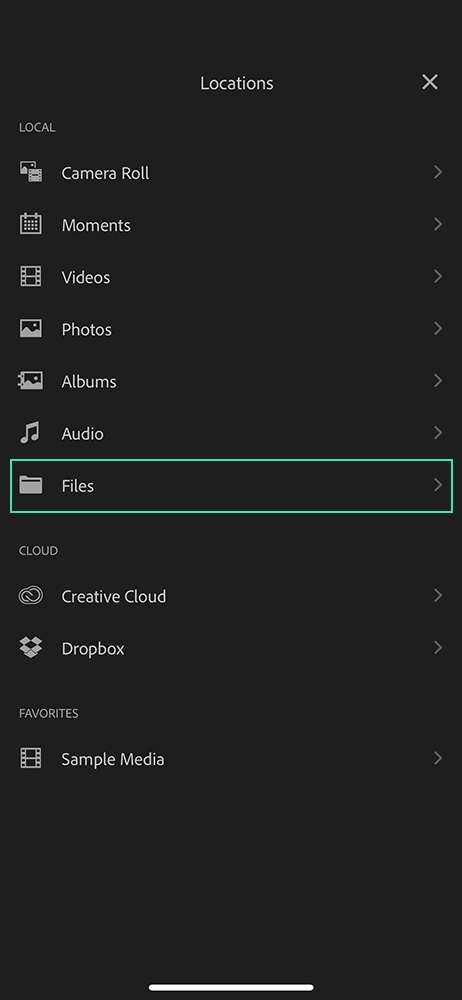
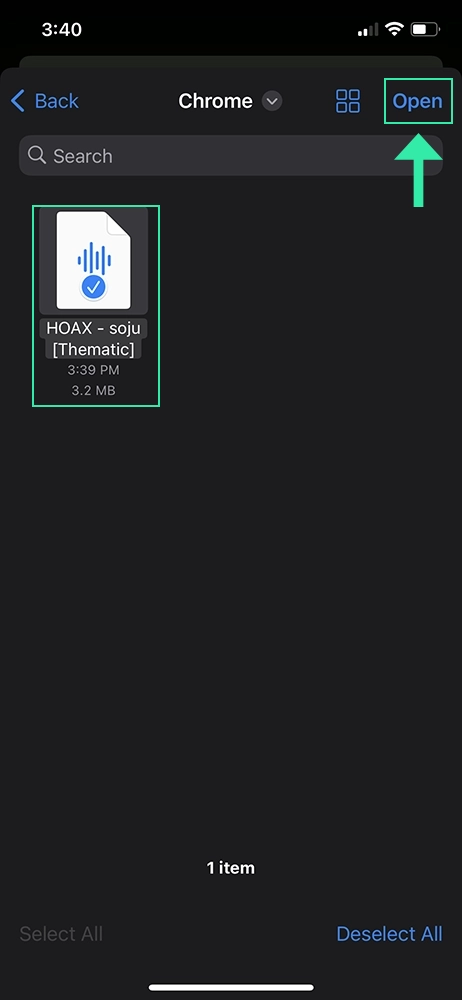
If you would like to add music to your video that is downloaded to your phone’s iCloud, Files or Downloads folders, click the Files menu item instead.
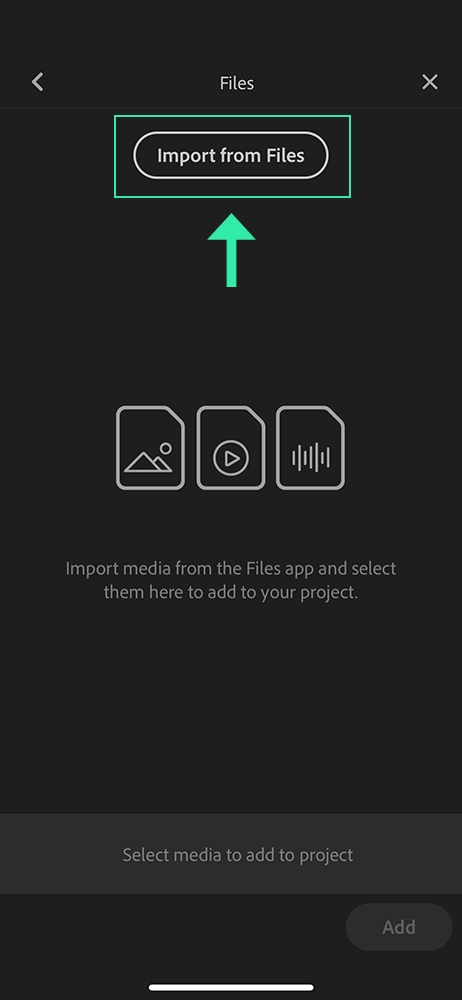
Click Import from Files on this page to locate the song files on your phone and then Add to add them to your video sequence.
Click here to find out how to find and use copyright-free music in your videos
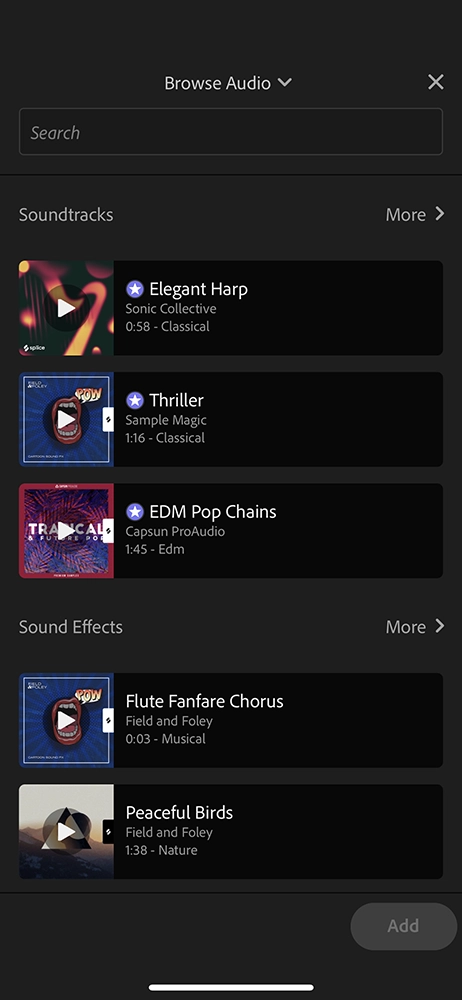
If instead you would like to select music provided by Adobe, you can click the blue + button on the edit screen and then Audio to browse Adobe’s selection of royalty-free songs and sound effects.
👉 Note: Some of the songs shown in Adobe’s library are only available on paid/premium plans. These songs and sound effects can only be used for personal use (no commercial projects).
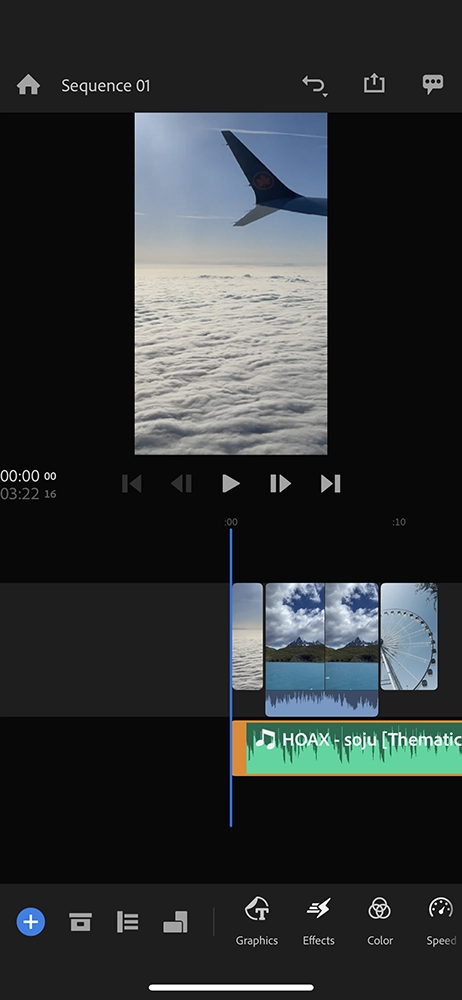
That’s it! After adding music to your video sequence, you’re ready to edit your video to the music. You can add additional video or audio files using the same steps as above, and edit the timing of your videos to the music.
How to adjust the volume of music in Adobe Premiere Rush mobile app
To adjust the volume of your audio in Adobe Premiere Rush, follow these steps:
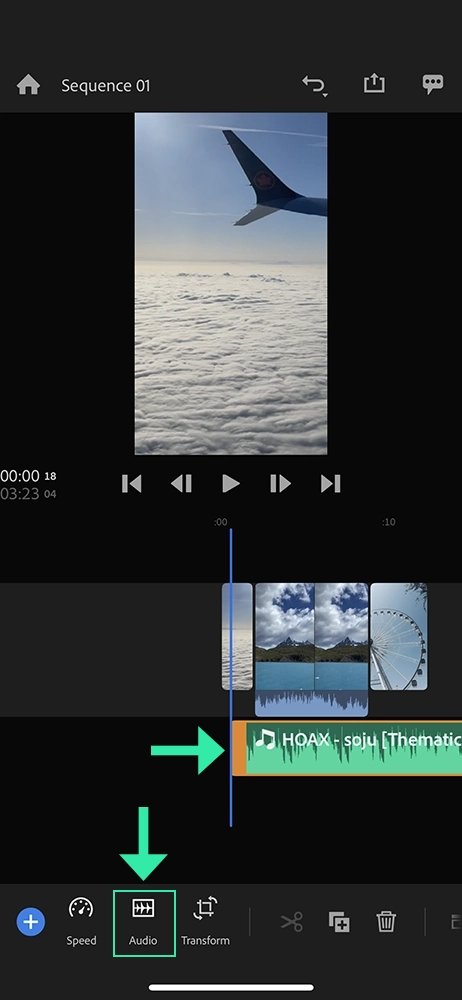
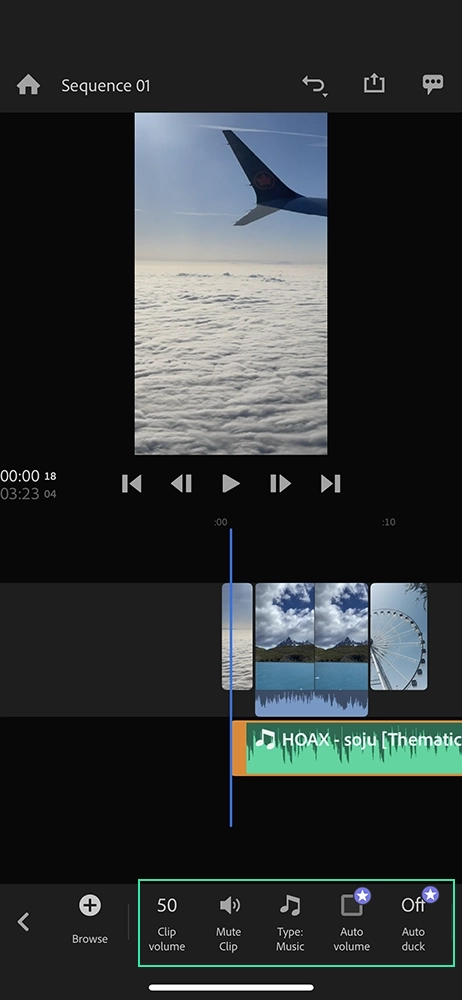
- Select the Audio Clip: Tap the song file in the editing screen.
- Access Volume Controls: Tap Audio from the bottom editing menu.
- Adjust Audio Settings:
- Use the clip volume slider to adjust the volume level.
- Tap Mute to silence the audio.
- Enable premium features like Auto Volume or Auto Ducking for automatic adjustments.
This allows you to fine-tune the audio for a balanced mix in your video ✅
How to Add Music to Adobe Premiere Rush Desktop App
Adobe Premiere Rush is also available as a desktop app, perfect for those who prefer editing videos on a computer instead of a mobile device.
Explore our quick and detailed guides below to learn how to easily add music to your videos using the Adobe Premiere Rush desktop app.
Quick Steps to Add Music to Premiere Rush Desktop App:
- Open Adobe Premiere Rush on your computer.
- Select your Video and Music Files: Browse and select the video and audio files downloaded to your device.
- Create Your Project: Click Create to add your selected files to the video timeline. Your video and audio files will appear in the timeline, allowing you to start editing your video to the music.
- Add More Audio Files:
- To add more audio, click the blue plus sign on the left menu.
- Select Your Media to browse for additional songs from your computer, or select Audio to explore Adobe’s royalty-free music and sound effects.
- Once you’ve selected the desired track(s), click Add to include them in your video sequence.
- Now you’re ready to enhance your video with the perfect soundtrack!
Detailed Instructions to Add Music in Premiere Rush Desktop App:
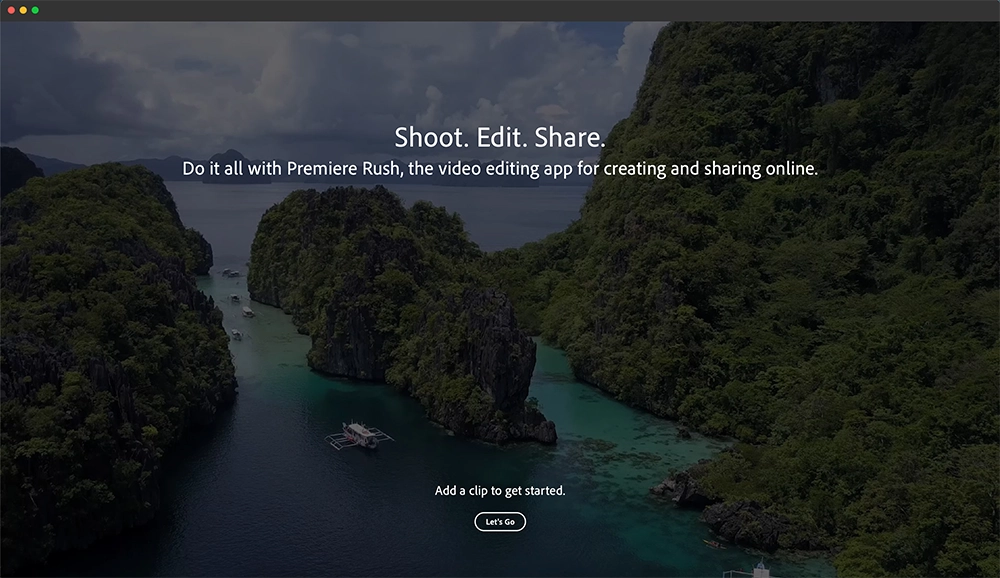
To get started, open Adobe Premiere Rush on your computer.
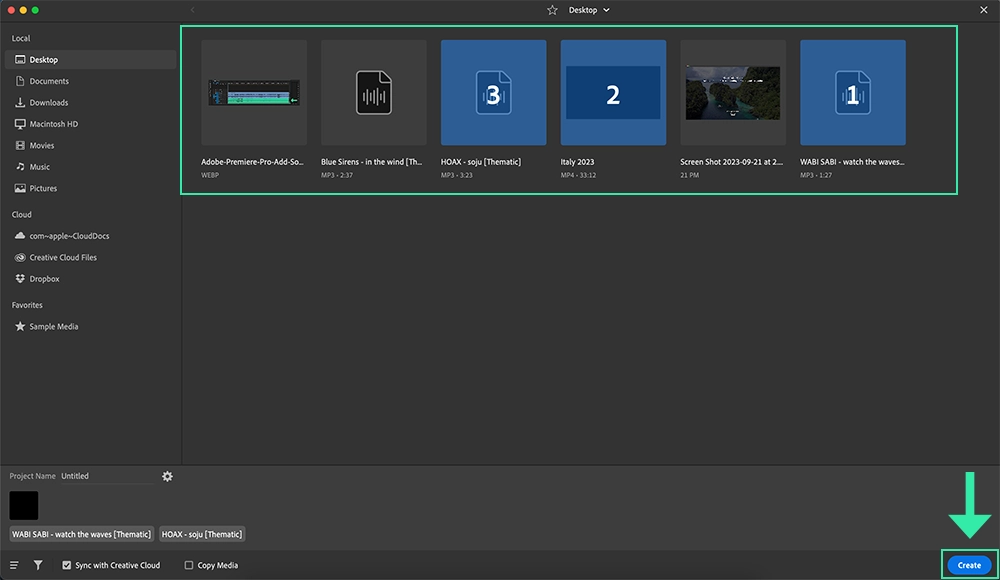
You will have the option to browse your device or hard drive files to search for select the video and song files you’d like to use in your video edit. Once your files have been selected, click the blue Create button.
Your selected video and audio files will be added to your video edit and you can start editing your video to the music right away!
If you would like to add more song or audio files to your video edit, simply click the blue plus sign from the left side menu.
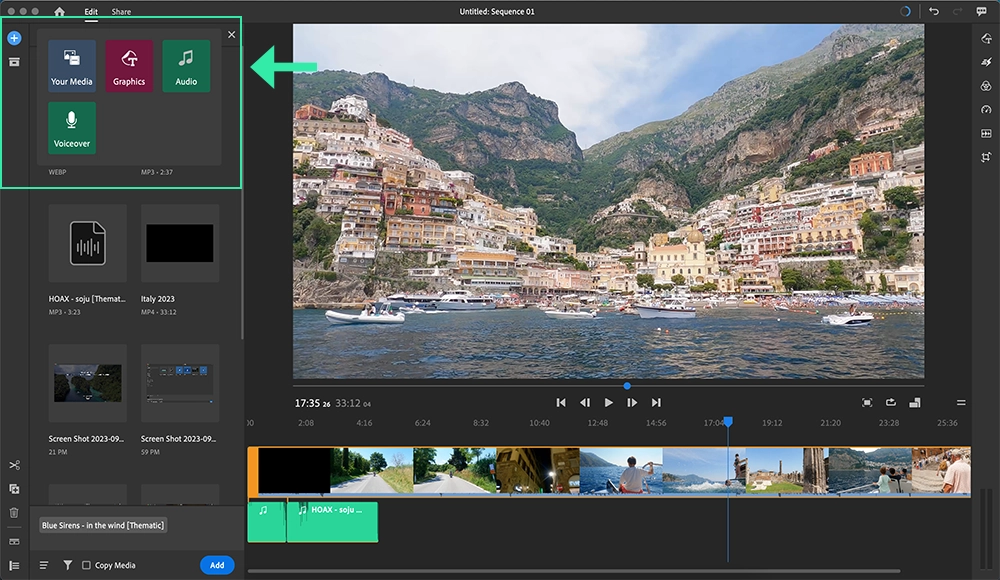
To add audio and song files that are downloaded to your computer or hard drive, select the Your Media button and browse for the songs you would like to add.
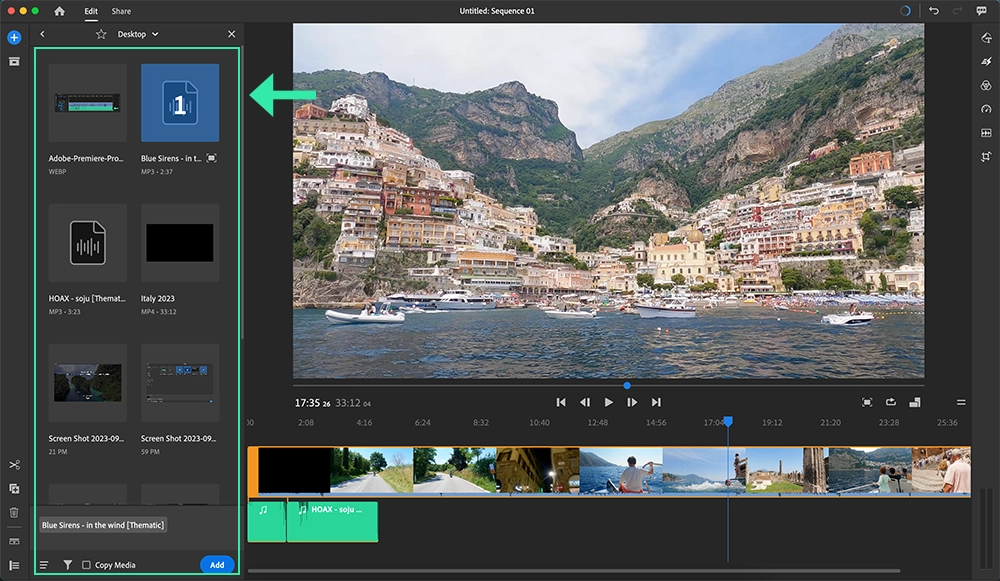
Not sure where to get copyright-free music for your videos? Find out how to get trending music from real artists for free with Thematic!
Or, if you would like to add music to your video edit from Adobe’s Stock Music library, select Audio to browse their selection of royalty-free songs and sound effects.
👉 Pro Tip: Some of the songs listed here are only available on paid/premium plans. These songs and SFX can be used for personal videos only.
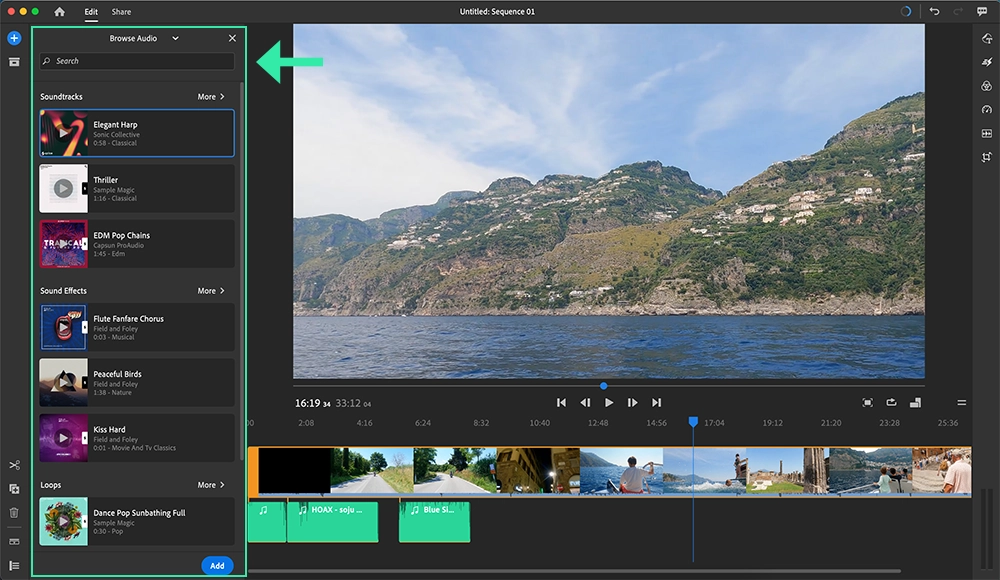
Once the files are selected, click the blue Add button to add them to your video edit. You’re now ready to edit your video to the music!
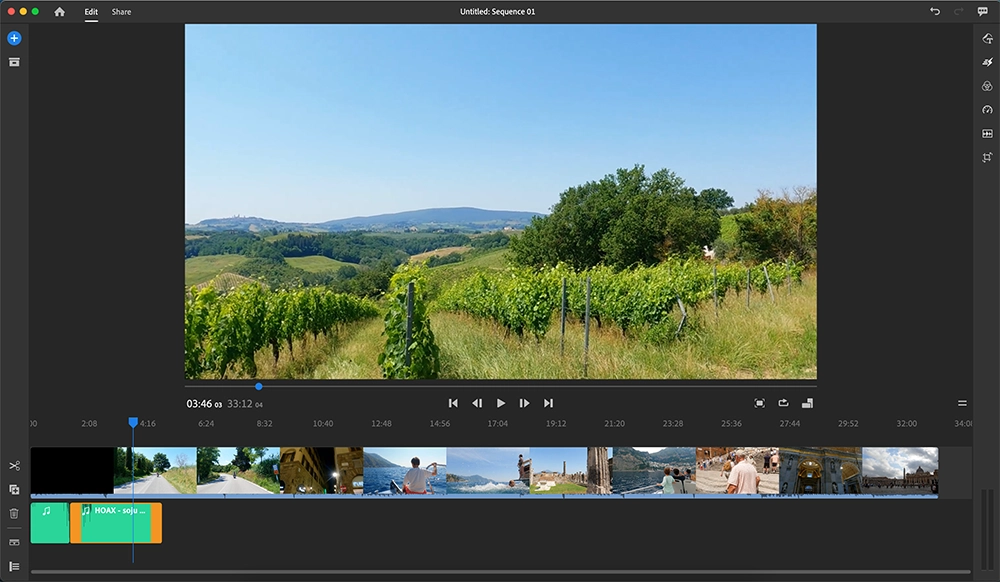
How to adjust the volume of music in Adobe Premiere Rush desktop app
To adjust the volume of your audio or music files in Adobe Premiere Rush:
- Select the Audio Clip: Click the music file in your timeline.
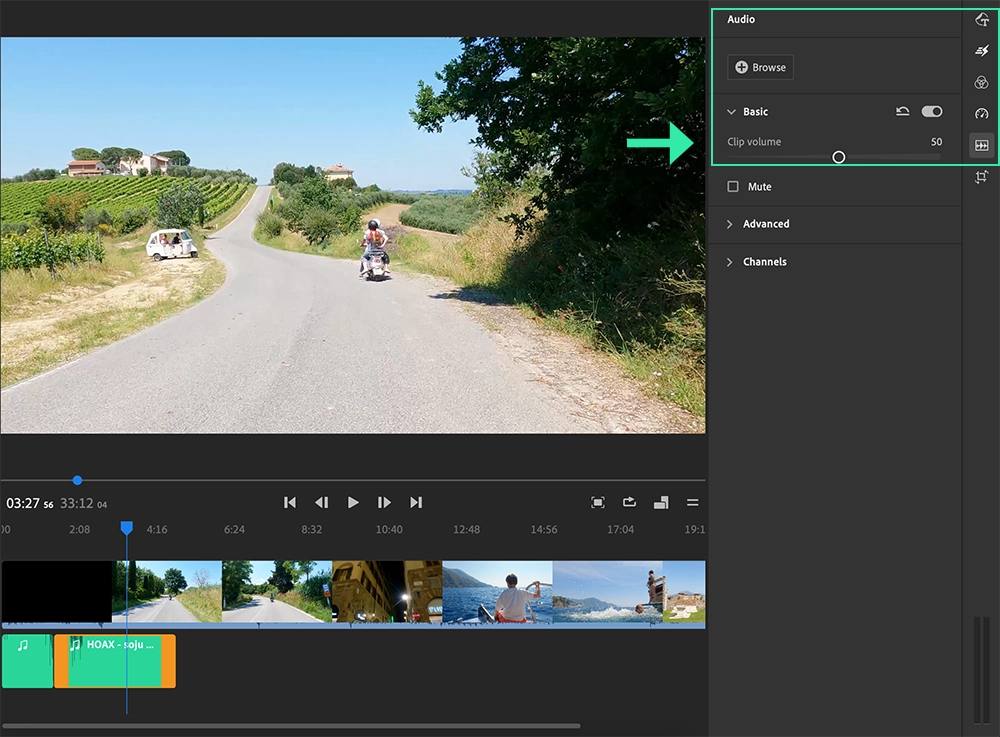
- Open the Audio Controls: Click the waveform icon in the right-side menu to access the audio settings.
- Adjust the Volume: Under the Basic section, use the volume slider to increase or decrease the volume of your selected audio clip.
This allows you to fine-tune the audio levels and ensure the perfect balance in your video.
Adobe Premiere Pro vs Adobe Premiere Rush
Adobe Premiere Pro and Adobe Premiere Rush are two powerful video editing tools offered by Adobe, each catering to different types of creators.
What is Premiere Rush?
Premiere Rush is a simplified version of Premiere Pro, designed for creators who are new to video editing and need a user-friendly, quick editing solution. With a simplified interface and fewer editing features compared to Premiere Pro, Rush is ideal for beginners or those editing on-the-go. Available on desktop, mobile, and web, it’s perfect for creators who want to create content easily and efficiently. If you’re new to video editing, Premiere Rush is a great starting point before transitioning to Premiere Pro.
Overview of Premiere Rush
- Best for beginner creators or casual editors
- Ideal for editing on-the-go with mobile support
- Free to get started with the Starter Plan
What is Premiere Pro?
Premiere Pro is a professional-grade video editing software with a comprehensive suite of advanced editing tools. It’s widely used by professional editors across various industries, including film, TV, and online content creation. Premiere Pro offers extensive capabilities such as color grading, audio editing, and visual effects. It’s a go-to tool for serious creators looking for powerful editing features.
Overview of Premiere Pro
- Best for experienced video editors and professionals
- Full suite of advanced editing tools and features
- Requires an Adobe subscription
Cost of Adobe Premiere Rush and Premiere Pro
Adobe Premiere Rush offers a free starter plan, providing creators with access to basic video editing features. To unlock premium features and advanced editing tools, you can upgrade to one of Premiere Rush’s paid plans. This allows you to access more robust functionalities, including full mobile app features and enhanced cloud storage for video projects.
See below for Adobe’s current pricing plans for their Premiere editing software (as of June 2025):
- Premiere Rush Starter plan: Free
- Limited access to Premiere Rush features
- Adobe Express Membership: $9.99 / month
- Full access to all Premiere Rush premium features & content
- Premiere Pro (Single App): $22.99 / month
- Full access to both Premiere Rush and Premiere Pro
- Adobe Creative Cloud Pro (All Apps): $69.99 / month
- Full access to all Adobe apps, including Premiere Pro & Premiere Rush
Video tutorial of how to add music to Adobe Premiere:
Thematic creator Katie Glasglow offers a fantastic video tutorial on adding music to your video edits, using Adobe Premiere Pro in her “how i edit (002) / my workflow, adding music + voice-overs, doodles, simple animations” video:
Katie is also a talented music artist on Thematic, and we highly recommend exploring out her beautiful songs, which are available for use in your Adobe Premiere Pro projects!
How To Get Free Copyright-Free Music for Videos
Now that you know how to add music to Adobe Premiere Pro, let’s guide you through how to find the best copyright-free music for your videos!
It can be frustrating to spend hours perfecting your video, only to face a copyright claim or strike when uploading it to platforms like YouTube, TikTok, or Instagram. Let’s make sure you avoid that issue by using royalty-free music.
Using Royalty-Free Music from Adobe Stock
Adobe offers royalty-free music and sound effects directly within the Rush desktop and mobile apps (accessible through the Audio tab). However, many creators have reported receiving false copyright claims when using this music on platforms like YouTube.
In Adobe Premiere Pro, you can access the Adobe Stock music library. While this library offers production music for your videos, it may require an additional subscription or a song-by-song licensing fee. However, keep in mind that this music is generally not made up of trending tracks from well-known artists, so you won’t find popular songs here.
Using Trending Copyright-Free Music from Thematic
Luckily, Thematic offers a much better solution for creators who need copyright-free music. With Thematic, you can access a wide range of high-quality, royalty-free music for YouTube videos, TikTok, social media, and podcasts—all at no cost. Best of all, the music is claim-free, ensuring your videos are safe from any copyright issues.
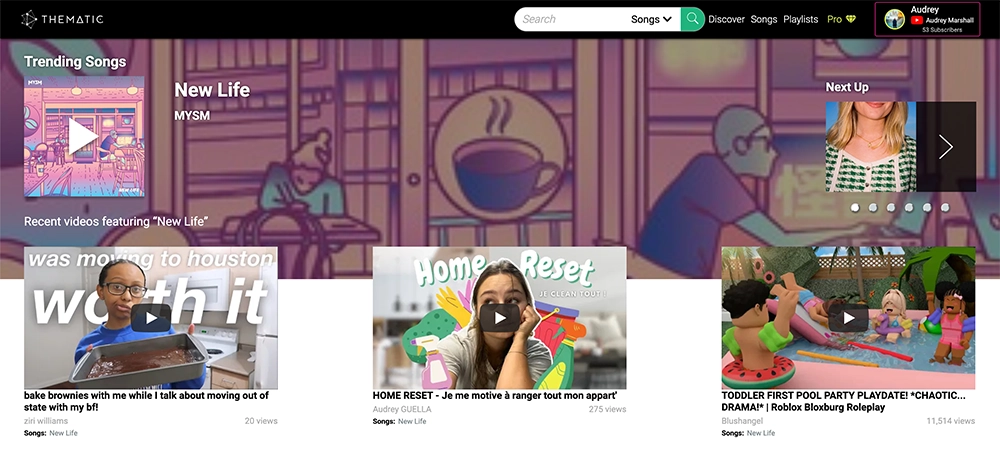
Thematic offers global usage rights, so you can use the music in any location, and with any number of followers. You can even incorporate the music into sponsored or branded content without any problems.
Creating a free Thematic account gives you access to unlimited music downloads, and you’ll keep 100% of your ad revenue with zero copyright claims.
Ready to level up your videos with amazing copyright-free music? Join Thematic’s thriving community of creators today and start using music in your content with peace of mind!
We hope you find this guide on how to add music to Adobe Premiere Rush & Pro helpful. You’re on your way to creating some amazing videos and we can’t wait to see them!
More Video Editing Guides 🔗
Still figuring out which video editing app is right for your creative workflow? Explore our step-by-step guides for adding music to videos in all of the top creator editing apps:
- How to Add Music to CapCut
- How to Add Music to iMovie
- How to Add Music to InShot
- How to Add Music to Edits (Instagram App)
- How to Add Music to Canva
- How to Add Music to DaVinci Resolve
Looking for more creator tools and resources? Visit Thematic’s Creator Toolkit for additional resources on creating content – including starting a YouTube channel, thumbnail and channel art templates, best practices, and of course, great royalty free songs to use in your videos for free with Thematic.

