Learn how to add music to YouTube videos the right way (before or after upload) without getting hit by copyright claims or strikes. This step-by-step covers everything from how to add music using the top video editing apps to sourcing music from YouTube’s built-in audio library, and even how to swap out copyrighted songs after your video is live.
And if you’re looking for copyright-safe music that won’t trigger takedowns, Thematic is a free music platform made for YouTube creators. You’ll find real songs from real artists – all cleared for use with no licensing headaches.
Here’s what this guide will cover:
✔️ How to add music using editing apps (iMovie, CapCut, InShot, Canva, DaVinci Resolve, or Adobe Premiere)
✔️ How to add or swap music inside YouTube Studio
✔️ Where to get copyright-safe music for your YouTube videos
✔️ Best practices for exporting video with music
Use the table of contents below to jump to the section you need:
- How to Add Music to YouTube Videos using Editing Apps
- How to Edit or Add Music to YouTube Videos After Upload
- Conclusion: Master How to Add Music to YouTube Videos with Confidence
How to Add Music to YouTube Videos Using Editing Apps (iMovie, CapCut, Premiere & More)
To add music to YouTube videos using an editing app, you’ll first edit the video and sync it with music, then export your video and upload it to YouTube.
This method gives you full control over how the music fits with your footage. And you can do it with a variety of popular editing tools, like iMovie, CapCut, InShot, and Adobe Premiere.
Quick Guide: Add to YouTube videos using editing apps:
Want to add music to your video before uploading it to YouTube? This quick guide will show you how to add music to YouTube videos using popular editing apps like iMovie, CapCut, and Premiere.
- Record your video footage.
- Find copyright-safe music you can legally use on YouTube. Platforms like Thematic offer free music from real artists that won’t trigger copyright claims.
- Import your footage and music into your favorite video editing app (e.g., iMovie, CapCut, InShot, Premiere).
- Sync your video with the music track – adjust volume, trim and align clips to fit the audio.
- Export your final video in MP4 or MOV format, using YouTube’s recommended export settings.
- Upload the video to YouTube, add your title/description, and include proper music credits (if required).
- Publish your video and double-check for copyright warnings in YouTube Studio.
✅ Pro Tip: Want to avoid copyright strikes? Try Thematic for free music made for creators.
Detailed guide: Add music to YouTube videos with editing software
Ready for a step-by-step walkthrough? This detailed guide will show you how to add music to YouTube videos with editing software step-by-step.
1. Record the video content for your YouTube video
Before you can add music to YouTube videos, you need the video itself. This can be original footage recorded with your phone or camera, screen recordings, animations, or even still images.
Import your visuals into the video editing app of your choice – like iMovie, Adobe Premiere Pro, CapCut, or InShot.
🛠️ Need help importing your clips? Check out our app-specific guides:
- How to Add Music to CapCut
- How to Add Music to iMovie
- How to Add Music to InShot
- How to Add Music to Edits (Instagram App)
- How to Add Music to Adobe Premiere Pro & Rush
- How to Add Music to DaVinci Resolve
2. Choose copyright-free music for your YouTube video
Music plays a huge role in how your YouTube video feels. The right track can add emotion, energy, and polish to your content – whether you’re making a vlog, tutorial, short film, or product review. But before you hit play on just any song, there’s one critical thing to understand:
When you want to add music to YouTube videos, it’s essential to pick copyright-free or licensed music from trusted sources to avoid getting copyright claims.
🎧 Why You Can’t Use Popular Songs in Your Videos (Even If You Credit the Artist)
Many creators assume that as long as they credit the artist or use a small portion of a song, it’s okay to add it to a YouTube video. That’s a common copyright myth.
In reality, using copyrighted music without permission can result in:
- Content ID claims (which may cause ads to appear on your video and loss of monetization)
- Copyright strikes (which remove your video and impact your channel’s standing)
- Blocked videos (where your video is limited in certain countries or on mobile devices)
For a full breakdown of how copyright works on YouTube and what happens when you use music without a license, check out our full guide: 👉 How Copyright Works on YouTube
✅ What Kind of Music Can You Use on YouTube?
To stay safe and compliant, always use:
- Royalty-free music
- Creative Commons music with proper attribution
- Music from a licensing platform like Thematic that grants you usage rights
- Tracks from the YouTube Audio Library, which are pre-cleared by YouTube
These options ensure your videos won’t get flagged and will remain monetizable (if you’re part of the YouTube Partner Program).
🔥 Where to Find Copyright-Free Music for YouTube Videos
There are a lot of music libraries out there, but not all are truly “free” or safe to use. Here are our top picks for creators:
🎵 Thematic – Free Music for YouTube with No Copyright Claims
Thematic is a music licensing platform built specifically for content creators. You get access to trending songs from real music artists, and everything is fully cleared for use on YouTube and other social media platforms.
✅ Why creators love Thematic:
- Music from real artists (not stock)
- 100% copyright-safe for YouTube
- Free for creators
- No Content ID claims or takedowns
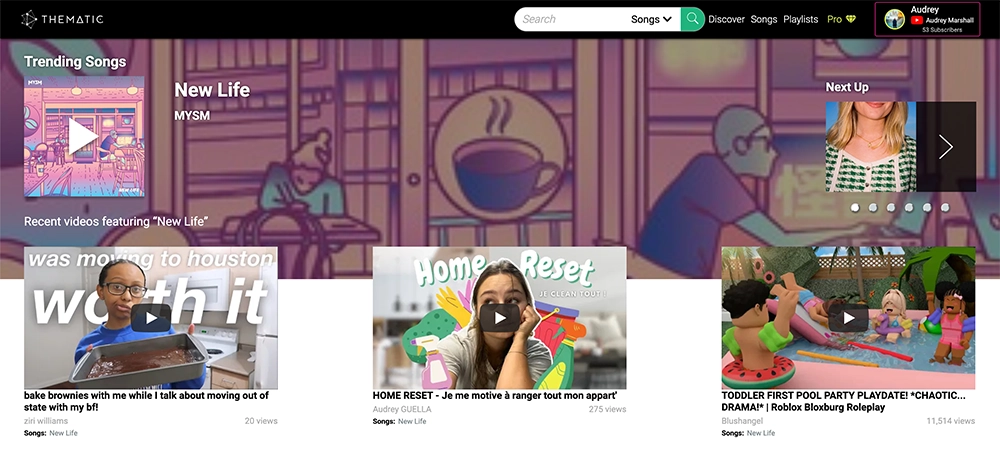
To use music from Thematic, you simply:
- Sign up for a free account
- Find a song and copy the license link
- Paste that link into your video description when you upload
If you’re ready to level-up your videos with great copyright-free music and join a collaborative and thriving community of creators, click here to sign-up for a free Thematic account today.
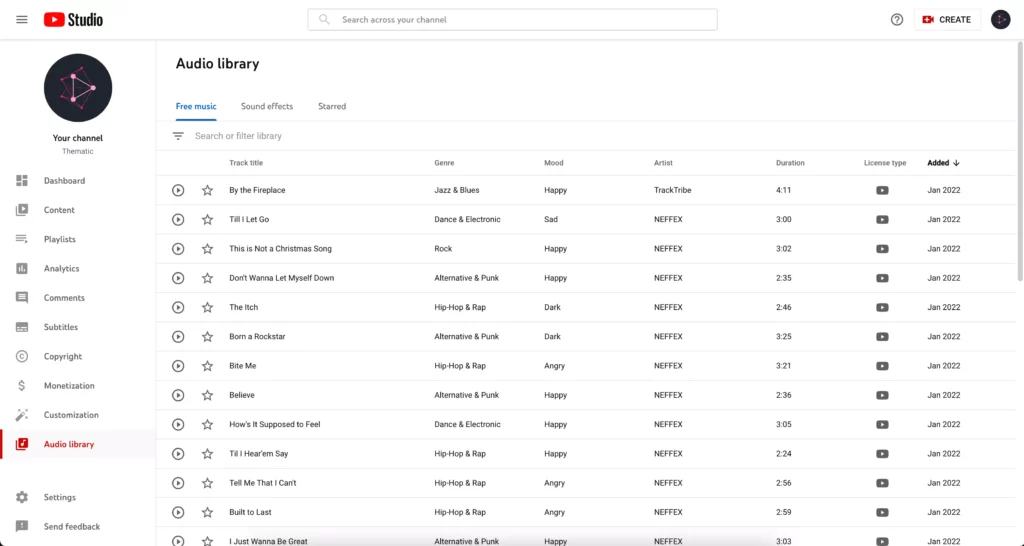
🎶 YouTube Audio Library: Songs for YouTube
YouTube’s Audio Library is available inside your YouTube Studio dashboard. It offers free music and sound effects that are safe to use in monetized videos. You can filter by mood, genre, length, and attribution requirements.
✅ Pro Tip: For more copyright-free music options for YouTube videos, check out the top free music platforms in our guide: 👉 Best Free Music Websites for YouTube Videos
📝 A Quick Note on Attribution
Even with copyright-free or royalty-free music, always double-check whether the song requires attribution (a credit in your video description). Many platforms (including Thematic) provide a license link or specific credit language you’ll need to copy/paste into your description. We cover exactly how to do that in the How to Credit Music section below.
3. Import your footage and music into your editing app
Once you’ve chosen your music track, download it to your device. Next, open your preferred video editing app (whether it’s iMovie, CapCut, Premiere, InShot, or another) and import both your footage and the music to your editing app to add music to YouTube videos effectively.
👉 Need help importing? Use our editing guides linked above in Step 1.
Now the fun begins! This is where you start shaping your video by syncing your visuals with your chosen music. Watch your creative vision come alive as you combine these elements seamlessly.
A few tips to make your music work for your video:
- Consider placing a powerful or catchy song right at the intro to grab your audience’s attention instantly.
- If your video includes voiceover or talking directly to the camera, use instrumental versions of songs during those sections so the vocals don’t clash or distract.
Keep in mind, this editing stage can take time, especially if your video is longer or the edit is more complex. Be patient and experiment until you feel your video truly reflects the story or mood you want to share with your viewers.
4. Sync your video with the music track
This is where the creative magic happens. Arrange your clips on the timeline and edit your footage to match the rhythm, mood, and beats of the music.
A few editing tips:
- Use cuts or transitions on the beat to make your video feel polished and intentional.
- Place high-energy moments during choruses or instrumental drops.
- If your video includes dialogue or voiceover, use instrumental versions of songs or lower the music volume during speech.
Don’t rush this step! It takes time to get it right, but the payoff in video quality is worth it.
5. Export your video
You want your video to look as best as it can be when shared on YouTube. Thankfully, YouTube has recommendations on how to best format and export your video so that it looks and sounds great for viewers. Below are the best practices and recommended settings to use when exporting videos for YouTube.
Recommended YouTube Video Export Settings
- Aspect Ratio: 16:9
- Resolution: 1080p (1920×1080) is standard, but 4K is ideal
- File Format: .MP4 (H.264 video codec, AAC audio codec)
- Frame Rate: Use the same as your recorded footage (typically 24, 30, or 60fps)
- Audio: Stereo, 48kHz or 96kHz sample rate
👉 Advanced details on the encoded settings can be found in YouTube’s help center.
Before uploading, preview your final file to confirm everything looks and sounds great. Double-check sync, audio levels, and quality.
6. Upload your video to YouTube
You’re ready to share your video to your YouTube channel and subscribers! If you haven’t set-up your YouTube channel yet, you can follow the steps in 👉 this guide to create your YouTube Channel.
Log into your YouTube channel and click the Upload icon (or “Create” → “Upload videos” from YouTube Studio). Then follow these easy steps:
- Select your video file
- Add a title, description, tags, and thumbnail
- Set your audience targeting and visibility settings
- Add optional elements like subtitles, end screens, or cards
- Run a copyright check
- Click Save
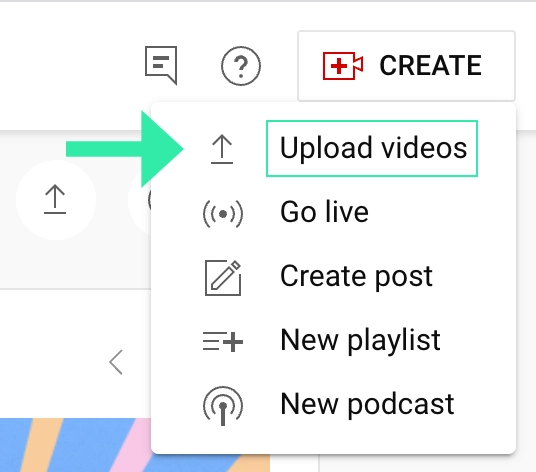
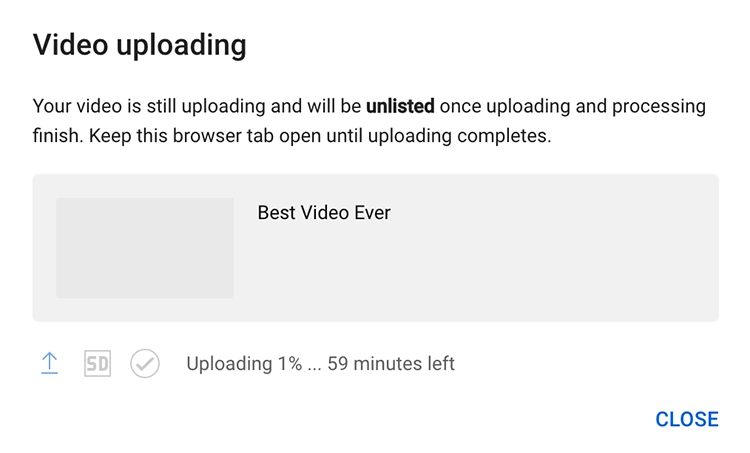
Your video will now begin uploading. You can monitor its progress from the YouTube Studio dashboard.
✅ Pro Tip: See our best practices on how to optimize videos for YouTube here.
7. Publish your video
Once processing finishes, your video is ready to go live! Watch it once in full via the YouTube player to make sure everything works as expected.
If you used copyright-free music (like from Thematic), your video should stay claim-free. But if you do run into any issues, check out our guide on how to fix YouTube copyright claims.
How to credit music in your video description
Always check the specific license terms for any music you use in your YouTube videos. Some music providers or licenses require you to include a clear credit (such as the song title, artist name, and a license link) in your video description.
For example, if you use music from Thematic, you must include the provided license link and credit in your description. This step is essential to activate your music license and protect your video from copyright claims.
Even if the music you use doesn’t legally require credit, it’s still a good practice to include it. Viewers often want to know more about the songs featured, and giving credit is a respectful nod to the artists who created the music.
Here are some best practices:
- Do include the full song title and artist name.
- Do add any required license links or attribution provided by the music source.
- Don’t skip the credit if the license specifically asks for it—this activates your music license and helps keep your video copyright-safe.
- Do credit music even when it’s not required; viewers appreciate knowing the song details.
Example credit format:
Song: “[Song Name]” by [Music Artist] – [Link to Spotify/YouTube Video]
✅ Pro Tip: Including a credit in your description doesn’t automatically grant you permission or a license to use the song. Your video may still be subject to copyright claims. Learn more about this and other common copyright myths here.
How to Edit or Add Music to YouTube Videos After Upload
If you want to add or change music on a video you’ve already uploaded to YouTube, this guide will walk you through using YouTube’s built-in tools and audio library to replace your current music with royalty-free tracks.
How to Add Music to YouTube videos Using YouTube’s Video Editor
YouTube’s Audio Library lets you add music to YouTube videos that have already been uploaded right from your YouTube Studio dashboard. Here’s how:
- Go to YouTube Studio and open the Content tab.
- Click the edit icon (pencil) on the video you want to edit.
- In the left menu, select Editor, then click Get Started.
- Click the Audio tab to browse YouTube’s Audio Library.
- Search or filter to find the song you want.
- Hover over the song and click Add to place it on your video timeline.
- Adjust the song’s start and stop points and mix level to fit your video.
- If you change your mind, click the three-dot menu to Remove the song.
- Click Save to apply your edits.
✅ Pro Tip: You can only use songs from YouTube’s Audio Library for this method. For other music sources, use a video editing app to add music before uploading to YouTube.
Screenshots: How to Add Music to YouTube Videos using YouTube’s Video Editor
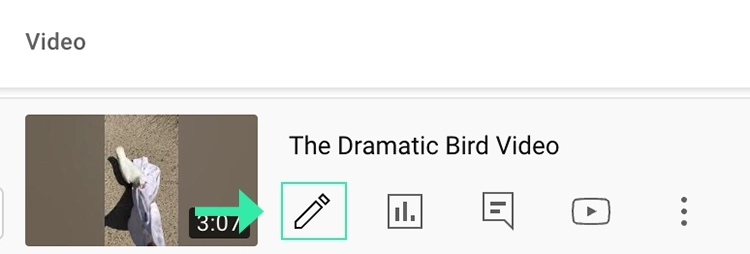
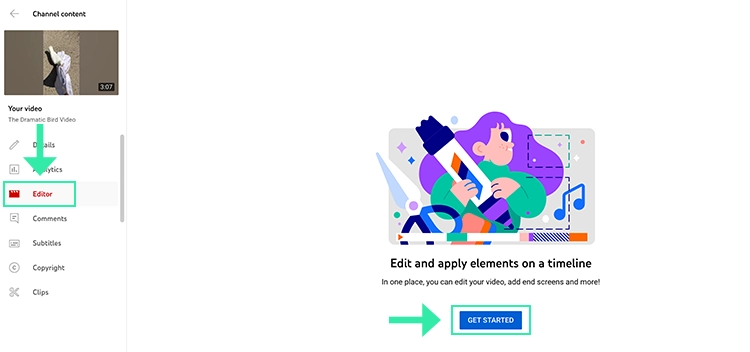
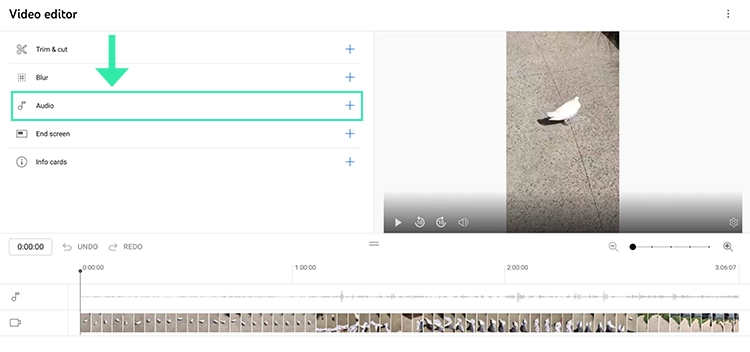
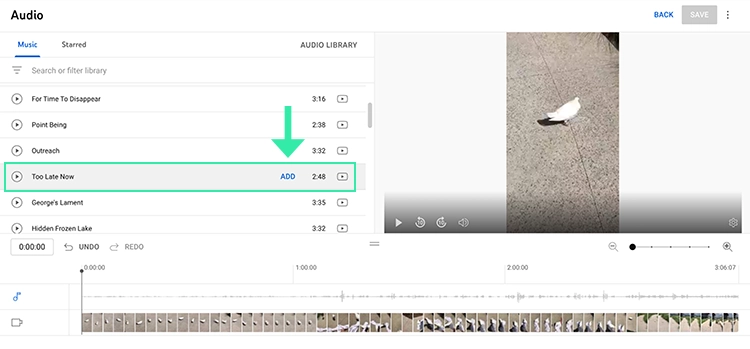
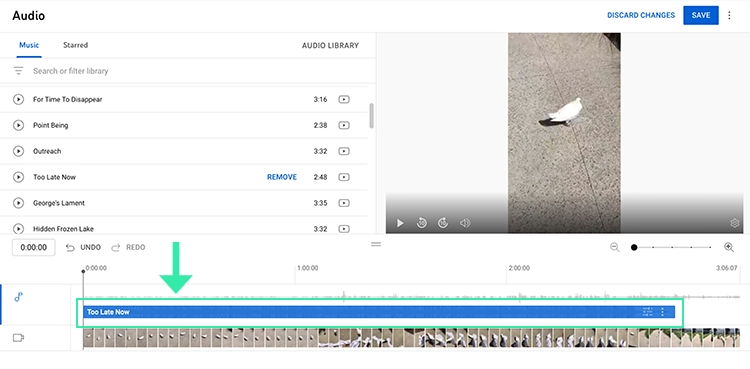
Once you’ve adjusted the songs and your video is looking & sounding great, simply click Save in the top right corner to apply your video edits. There may be a processing time to finalize your edits, but YouTube will let you know once this is completed.
How to Replace Music to Remove a Copyright Song or Copyright Claim
In the case that you’ve uploaded a video to YouTube and received a copyright claim, YouTube may provide you with an option to replace the copyrighted song in your video. Replacing the copyrighted song will remove and fix the copyright claim on your video immediately.
Here’s how to replace the music in your uploaded YouTube video:
- In YouTube Studio, go to Content and find the video with the copyright claim.
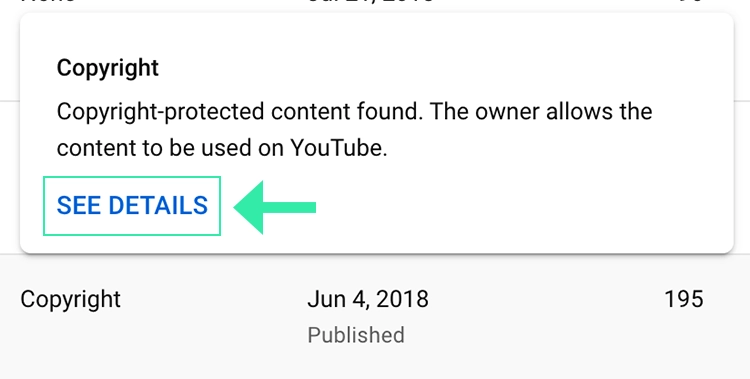
- Hover over the Copyright restriction message and click See Details.
- In the pop-up, click the three-dot Actions menu next to the claimed song.
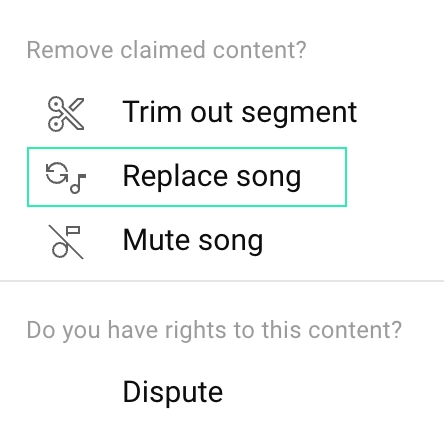
- You’ll see several options to handle the claim:
Trim out segment – Remove the entire portion of the video containing the copyrighted music (including the video footage).
Mute song – Fully mute the copyrighted song’s audio.
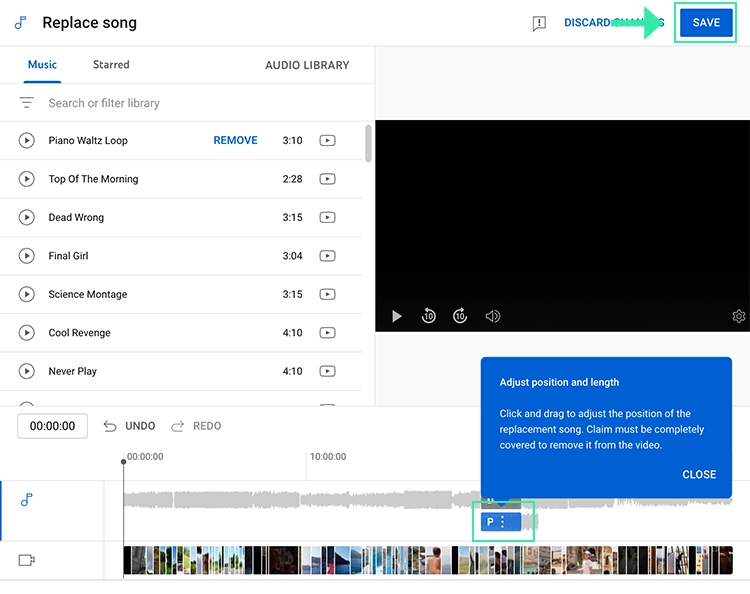
Replace song – Swap out the copyrighted song with a track from YouTube’s Audio Library.
Erase song – emove only the copyrighted song, keeping other audio like voiceover or sound effects.
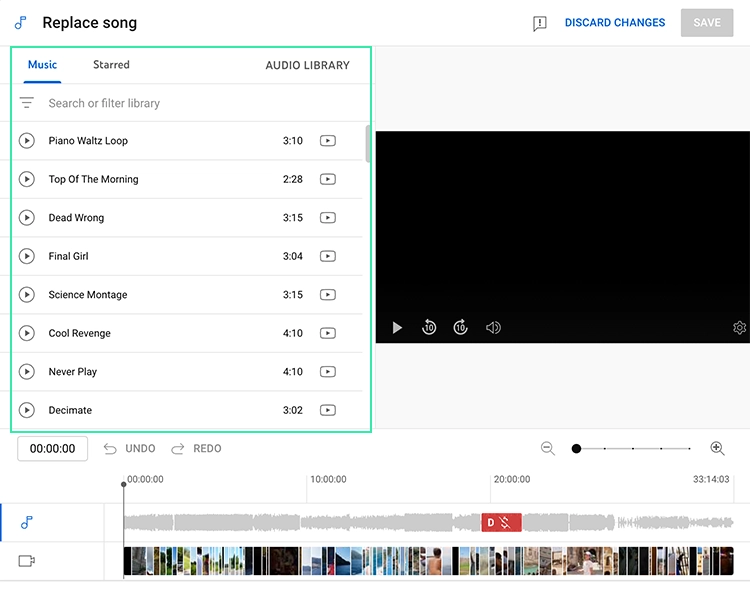
Dispute – Challenge the claim if you believe it’s incorrect or if you have rights to use the music. - Select Replace song to enter the editor.
- Browse YouTube’s Audio Library, pick a replacement song, and click Add.
- Adjust the new song’s start and stop timing to fit your video.
- Click Save to apply your changes and clear the copyright claim.
Screenshots: How to Replace Music to Remove a Copyright Claim

Video Tutorial: Add Music to YouTube Videos Using YouTube’s Video Editor
For a step-by-step walkthrough, check out Thematic creator Ben Truong‘s tutorial on using YouTube’s video editor to add music to YouTube videos:
✅ Pro Tip: Need help adding music to YouTube Shorts? See our dedicated guide here.
Conclusion: Master How to Add Music to YouTube Videos with Confidence
Adding the perfect soundtrack can transform your YouTube videos from good to great. Whether you’re just starting out or editing a video you’ve already uploaded, knowing how to add music to YouTube videos the right way is essential to avoid copyright claims and keep your content safe.
From choosing copyright-free music to using popular editing apps or YouTube’s built-in editor, this guide on how to add music to YouTube videos has walked you through every step of the process. Remember to always check the licensing terms and give proper credit when required – it’s both respectful to artists and important for your channel’s protection.
By mastering these techniques, you can confidently enhance your videos with music that fits your style and engages your audience, all while staying copyright compliant.
Start applying these tips today and see how learning to add music to YouTube videos can elevate your content and grow your channel!
We hope you find this guide on how to add music to YouTube videos super helpful. You’re on your way to creating awesome videos for your YouTube channel and we can’t wait to watch them!
Looking for more creator tools and resources? Visit Thematic’s Creator Toolkit for additional resources on creating content – including starting a YouTube channel, thumbnail and channel art templates, best practices, and of course, great royalty free songs to use in your videos for free with Thematic.

